With a tennis team named Overserved, we always offer some kind of "special" drink when we host a visiting opponent. So far this season, you could have enjoyed Bloody Marys and milk punch. For our most recent match, however, my teammate Lynn and I set up a mimosa bar.
I first got the idea from Pinterest (of course). Sure, you will find some fancy and beautiful presentations in Pinterest Land that require matching milk jars, labels, and such. This version, on the other hand, is quite simple. I think it is perfect for a more casual setting such as a family get-together, tailgating, etc.
Lynn provided different variations of fruit juice by Simply: lemonade, orange, lemonade-raspberry, and cranberry. I provided two bottles of champagne. Typically, mimosas are made by combining equal parts juice and champagne. Since this is a self-serve bar, one would have the flexibility to adjust that ratio. No judging here! ;) Although we only offered fresh raspberries in keeping with the "simple" theme, you could certainly expand the fruit offerings to include orange slices, lemon slices, cranberries, blueberries, etc.
As soon as Lynn showed me her silver champagne bucket, I knew it would be the perfect match to one of my vintage tarnished silver trays I display above my stove.
I also used this mimosa bar as an opportunity to practice what I learned in my calligraphy class. Yes, I know. I still need more practice!
Unfortunately, we were able to complete only one match before the rain came. Under these conditions, though, the mimosa bar turned out to be the most perfect Plan B.
Adapted from: Sweet Phi.
Saturday, October 3, 2015
Saturday, August 22, 2015
Fourth Annual Cinnamon Roll DOE
This week, I taught another class on experimental design concepts. I really enjoy what has now become an annual tradition of demonstrating this Lean Six Sigma tool by experimenting in class with my basic cinnamon roll recipe. (Pinch me! I get paid to do this!) :D
Each year, I try to come up with a different theme. The first class I tried this simulation in enjoyed red velvet variations. Two years ago, the class got to try different orange variations. Last year's theme was chocolate. This week? I wanted to experiment with healthy substitutions. Yeah, it's pretty ironic to see "cinnamon rolls" and "healthy" in the same sentence. The challenge was on!
Here are the new questions I wanted this experiment to answer:
1. Would a healthier substitute for the sugar that I use in the dough make a difference? What if I used natural honey instead of refined white sugar?
2. Would a healthier substitute for the oil that I use in the dough make a difference? Lately, I've been using coconut oil for so many things. Maybe it would work for the cinnamon rolls, too?
3. Would a gluten-free cinnamon roll be preferred? Doubt it. But, would it at least be tolerable? One blogger swears that tapioca flour mixed with coconut flour produces a great dough. (And, if it's on the internet, it must be true. Right?)
4. Would a healthier substitute for the brown sugar that I use in the filling make a difference? What about using coconut palm sugar instead? It even looks like brown sugar!
5. Would a healthier substitute for the butter I use in the filling make a difference? I first learned about ghee last year when I completed a Whole 30, and I've been cooking with it ever since. Ghee is clarified butter that is pure butterfat without the milk solids and water. It is better tolerated by those with dairy sensitivities, and it's even found to lower levels of unhealthy cholesterol. Now, wouldn't it be nice for a doctor to say, "Since you need to lower your cholesterol, eat cinnamon rolls!" (Keep dreaming . . .)
6. Would a healthier substitute for the really sweet glaze icing make a difference? What if I used natural honey here, too?
7. Would placing a label on the package (either gluten-full or gluten-free) make a difference? Here, I was speculating that some people may look at a gluten-free label and already have some preconceived biases about the taste before even taking a bite.
As before, for those of you who just want to bypass the details and simply find the answers to these questions, simply scroll to the bottom of this post. For the rest of you . . .
Here is another way of listing the factors, or changes, that I wanted to try:
Factor: Current Condition: Change to Try:
A:Dough Sugar Regular sugar Honey
B: Dough Oil Canola oil Coconut oil
C: Dough Flour Gluten-full Gluten-free
D: Filling Sugar Brown sugar Coconut palm sugar
E: Filling Butter Regular butter Ghee
F: Icing Regular glaze Honey
G: Label No label Label
I made 8 different batches of cinnamon rolls, each with differing combinations of above.
The first four batches were made with the regular bread flour (gluten-full):
Batch 1: Dough made with regular sugar, canola oil, and bread flour. Filling made with coconut palm sugar and ghee. Honey icing and no label.
Batch 2: Dough made with honey, canola oil, and bread flour. Filling made with brown sugar and real butter. Honey icing and a gluten-full label.
Batch 3: Dough made with sugar, coconut oil, and bread flour. Filling made with brown sugar and ghee. Regular glaze icing and a gluten-full label.
Batch 4: Dough made with honey, coconut oil, and bread flour. Filling made with coconut palm sugar and real butter. Regular glaze icing and no label.
The last four batches were made with the tapioca and coconut flour (gluten-free):
Batch 5: Dough made with sugar, canola oil, and gluten-free flour. Filling made with coconut palm sugar and real butter. Regular glaze icing and a gluten-free label.
Batch 6: Dough made with honey, canola oil, and gluten-free flour. Filling made with brown sugar and ghee. Regular glaze icing and no label.
Batch 7: Dough made with sugar, coconut oil, and gluten-free flour. Filling made with brown sugar and real butter. Honey icing and no label.
Batch 8: Dough made with honey, coconut oil, and gluten-free flour. Filling made with coconut palm sugar and ghee. Honey icing and a gluten-free label.
As before, I asked each student/co-worker who wanted to participate in this experiment to taste a particular batch (or batches) of cinnamon rolls. (A big thanks to all who participated!) Then, each was asked to provide a "likeability" score (using a 1-5 scale) by completing the following survey:
As before, I collected 10 surveys for each batch, for a total of 80 observations. After analyzing the results, I learned that only one thing made a difference: changing the flour significantly affected the likeability score. This is depicted in the chart below by the very long bar.
This was the boldest factor I've tested in the various cinnamon roll DOEs. I wasn't surprised at all by the results. When I picked up the dough to knead it into rolls, the gluten-free dough felt like dried crumbly Play-doh. It was awful! It seemed to take forever just to get it to stick together. I'm certain that if I had collected data on some visual assessment in addition to the likeability score, it would have bombed here, too. They were a hot mess: little tiny blobs that never did rise. (See graph below.)
![]() |
| Like working with dry, crumbly Play-doh |
![]() |
| What a mess! |
Not only did the gluten-free dough significantly decrease the likeability score on average, but it also significantly increased variation. You'll notice below that survey responses spanned the entire range of the rating scale from 1 to 5. In other words, opinions were all over the place!
Interestingly, there was essentially no difference in the likeability score when changing any of the other factors. The more I started thinking about the analysis, though, the more I was afraid that I may have missed something. It was very apparent when observing the different taste testers that there were two distinct groups of individuals: those who cared about healthy alternatives and those who couldn't care less. I was afraid that the extreme effect of the dough change may have overshadowed other important ingredient changes. Hindsight, I probably should have done a separate DOE for those two customer segments.
It wasn't practical for me to start the baking process over again. Instead, I created a subset of my data, focusing on only those recipes that used the regular bread dough (gluten-full) and continued to explore the ingredient changes.
It turns out that a couple of other factors were indeed significant after all!
Changing the original sweet regular glaze icing to honey appears to hurt the likeability score when you're only focusing on the nice, gluten-full cinnamon rolls.
On the other hand, it appears that using coconut oil instead of the canola oil appears to significantly improve the likeability score. We found a winner!
Bottom line: People preferred the nice, gluten-full cinnamon rolls over the gluten-free alternative. Not even close. When using the original bread flour (gluten-full), it appears that changing the icing to honey hurt, so keep using the regular glaze icing. If you want to reduce some of your sugar intake, though, it would be OK to substitute honey for the sugar in the dough (not icing) and substitute coconut palm sugar for the regular brown sugar in the filling. You could also substitute ghee for regular butter. Those three substitutions didn't hurt the likeability score. I'm also getting a clue that I should be changing the canola oil to coconut oil. I'd like to test that one again just to be sure. As before, I’m already looking forward to the next round of experimentation!
Saturday, July 11, 2015
A Doc McStuffins Birthday
I have always loved celebrating birthdays! I have fond memories planning over-the-top birthday parties for Keely with some kind of theme: Minnie Mouse (twice!), Little Mermaid, Barney, Pocahontas, etc. While I'm certain Keely will never outgrow wanting some amount of pink and sprinkles for her birthday celebrations, it's been a long time since I've planned a Disney themed party.
Needless to say, I was thrilled when my friend Damaris asked me to help her plan little Olivia's third birthday party. The theme? Doc McStuffins. Wait. What? Who? This was the first time I had even heard the name of that character! So, if you're like me, here is a quick synopsis:
"The series chronicles a girl named Dottie "Doc" McStuffins who decides she wants to become a doctor like her mother. She practices her dream by fixing toys and dolls. When she puts on her stethoscope, toys, dolls, and stuffed animals come to life and she can interact with them. With help from her stuffed animal friends – Stuffy the Dragon, Hallie the Hippo, Lambie the Lamb, and Chilly the Snowman – Doc helps toys recover, or "feel better", by giving them check-ups and diagnosing their illnesses."
What a wonderful role model! From the start, I knew this would be a fun project!
The invitations were adorable. I created the graphic while Damaris turned it into a clipboard and even added a real band-aid for a nice finishing touch. The birthday girl approved, so we knew we were off to a good start.
Now for the menu. We wanted foods that sounded good with Doc's stuffed animal friends (Stuffy the Dragon, Hallie the Hippo, Lambie the Lamb, and Chilly the Snowman) or at least tied into the overall theme of wellness. Then, I created food labels similar to the ones I made for Keely's UT graduation party, Hayley's POP! baby shower, Hannah's book-themed baby shower, and Natalia's Georgia Southern graduation party.
For starters, party-goers could enjoy chicken bites, hummus, muffins, applesauce, and cream cheese stuffed strawberries.
Olivia's mom and dad, Theresa and Joey, provided each party-goer with a doctor's bag filled with M&M vitamins, band aids, wet wipes, a cookie, and stickers. Each child was able to give a check-up to their own favorite stuffed animal. I'm certain a great time was had by all!
Needless to say, I was thrilled when my friend Damaris asked me to help her plan little Olivia's third birthday party. The theme? Doc McStuffins. Wait. What? Who? This was the first time I had even heard the name of that character! So, if you're like me, here is a quick synopsis:
"The series chronicles a girl named Dottie "Doc" McStuffins who decides she wants to become a doctor like her mother. She practices her dream by fixing toys and dolls. When she puts on her stethoscope, toys, dolls, and stuffed animals come to life and she can interact with them. With help from her stuffed animal friends – Stuffy the Dragon, Hallie the Hippo, Lambie the Lamb, and Chilly the Snowman – Doc helps toys recover, or "feel better", by giving them check-ups and diagnosing their illnesses."
What a wonderful role model! From the start, I knew this would be a fun project!
The invitations were adorable. I created the graphic while Damaris turned it into a clipboard and even added a real band-aid for a nice finishing touch. The birthday girl approved, so we knew we were off to a good start.
Now for the menu. We wanted foods that sounded good with Doc's stuffed animal friends (Stuffy the Dragon, Hallie the Hippo, Lambie the Lamb, and Chilly the Snowman) or at least tied into the overall theme of wellness. Then, I created food labels similar to the ones I made for Keely's UT graduation party, Hayley's POP! baby shower, Hannah's book-themed baby shower, and Natalia's Georgia Southern graduation party.
For starters, party-goers could enjoy chicken bites, hummus, muffins, applesauce, and cream cheese stuffed strawberries.
In addition to the main foods, the kids could enjoy edible cotton balls (marshmallows), lollipops, cookies shaped like band-aids, Hershey kisses, vitamins (M&Ms), cotton swabs made from pretzels dipped in white chocolate, and "gauze" (fruit roll-ups).
Even drinks were "doctored up" as fluids and Lambie's pink lemonade.
Sunday, May 24, 2015
Moon Pie Banana Pudding
What a beautiful Memorial Day weekend! We will be celebrating this afternoon with our neighborhood's annual block party. Last year was our first time attending as new homeowners. I was so impressed! Due to the numerous volunteers who work this event, the cost per person ends up being only $7. This includes live entertainment, barbecue pork and hot dogs, and then all kinds of side dishes and desserts brought by neighbors. Best deal ever!
I'm used to having pot luck parties for up to 100 people. Leaving it to chance, we always managed to end up with a nice variety of food. However, how do you plan something similar for over a thousand families? Don't leave it to chance. We have guidelines:
Last Names:
A-H Dessert Item
I-Q Salad item (green, fruit, potato salad, etc)
R-Z Side Item (pastas, vegetables, greens, chips, etc)
The only problem with these guidelines is that I'm supposed to bring a salad item. I complied last year, but not this year. (Steve's rubbing off on me I suppose.) I really wanted to make moon pie banana pudding. One taste of this twist on a classic Southern dish, and I'm betting (at least hoping) that I'll be forgiven.
Moon Pie Banana Pudding
Ingredients:
Prepare pudding mix and 4 cups milk as directed on package. Whisk in sour
cream; let stand until pudding thickens.
Pour half of pudding into a 2-quart baking dish. Layer moon pie wedges evenly over pudding. Top evenly with banana slices and remaining half of pudding. Top with Cool Whip. Arrange remaining sandwich wedges around outer edge of dish (optional). Cover and chill at least 2 hours or overnight.
Recipe adapted from Southern Living's The Official SEC Tailgating Cookbook.
I'm used to having pot luck parties for up to 100 people. Leaving it to chance, we always managed to end up with a nice variety of food. However, how do you plan something similar for over a thousand families? Don't leave it to chance. We have guidelines:
Last Names:
A-H Dessert Item
I-Q Salad item (green, fruit, potato salad, etc)
R-Z Side Item (pastas, vegetables, greens, chips, etc)
The only problem with these guidelines is that I'm supposed to bring a salad item. I complied last year, but not this year. (Steve's rubbing off on me I suppose.) I really wanted to make moon pie banana pudding. One taste of this twist on a classic Southern dish, and I'm betting (at least hoping) that I'll be forgiven.
Moon Pie Banana Pudding
Ingredients:
- 2 (3.4 oz) packages vanilla pudding mix
- 4 cups milk
- 1 (8 oz) container sour cream
- 8 (2.75 oz) moon pies, cut into eighths (I used 12 mini moon pies, each cut into sixths; I used 6 more for garnishes that are completely optional.)
- 4 bananas, sliced
- 1 (8 oz) container Cool Whip, thawed
Pour half of pudding into a 2-quart baking dish. Layer moon pie wedges evenly over pudding. Top evenly with banana slices and remaining half of pudding. Top with Cool Whip. Arrange remaining sandwich wedges around outer edge of dish (optional). Cover and chill at least 2 hours or overnight.
Recipe adapted from Southern Living's The Official SEC Tailgating Cookbook.
Friday, March 13, 2015
Orange Creamsicle Poke Cake
March Madness - I love this time of the year! We celebrated Christmas in March this past Wednesday since Keely bought Steve tickets to the opening of the SEC tournament. Even though UT wasn't playing in the first round, the atmosphere was so much fun. I'm so glad that Nashville will be hosting this event for the next ten years!
Since we didn't have tickets for the following round, I planned for a UT celebration at home. Keely's friend Lauren joined us last night for a dinner of grilled chicken, baked potatoes (both orange and white!), roasted brussel sprouts, and sliced tomatoes. This was a perfectexcuse opportunity to try a new dessert. I headed to my trusty Pinterest board: My Blood Runneth Orange. I pinned this orange creamsicle poke cake some time ago.
It was a hit! Steve even had it for breakfast this morning. I'll definitely be making this one again as it brought us some luck: UT upset Vandy! I'm hoping Friday the 13th means bad luck for Arkansas tonight . . . go Vols!
Orange Creamsicle Poke Cake
Ingredients:
Since we didn't have tickets for the following round, I planned for a UT celebration at home. Keely's friend Lauren joined us last night for a dinner of grilled chicken, baked potatoes (both orange and white!), roasted brussel sprouts, and sliced tomatoes. This was a perfect
It was a hit! Steve even had it for breakfast this morning. I'll definitely be making this one again as it brought us some luck: UT upset Vandy! I'm hoping Friday the 13th means bad luck for Arkansas tonight . . . go Vols!
Orange Creamsicle Poke Cake
Ingredients:
- 1 white cake mix
- 1 cup orange juice
- 1 large box (6 oz) orange Jell-o
- 2 cups boiling water
- 1 small box (3.4 oz) instant vanilla pudding
- 1 cup milk
- 1 small container (8 oz) Cool Whip
Directions:
Bake cake in a 9x13 dish according to directions, but substitute orange juice for water. In the mean time, dissolve
the orange Jell-o in boiling water. Let cool while the cake is baking.
Remove cake from oven and poke holes all
over the top with a fork. Spoon orange Jell-o over the top of the cake, making sure it goes in the holes.
Cool completely in the refrigerator.
Whisk
together the vanilla pudding mix and milk. Fold in the Cool Whip and spread over the completely cooled cake. Keep refrigerated.
Recipe adapted from: Inside Bru Crew Life
![]() |
| "Merry Christmas in March, Coach!" |
Wednesday, February 11, 2015
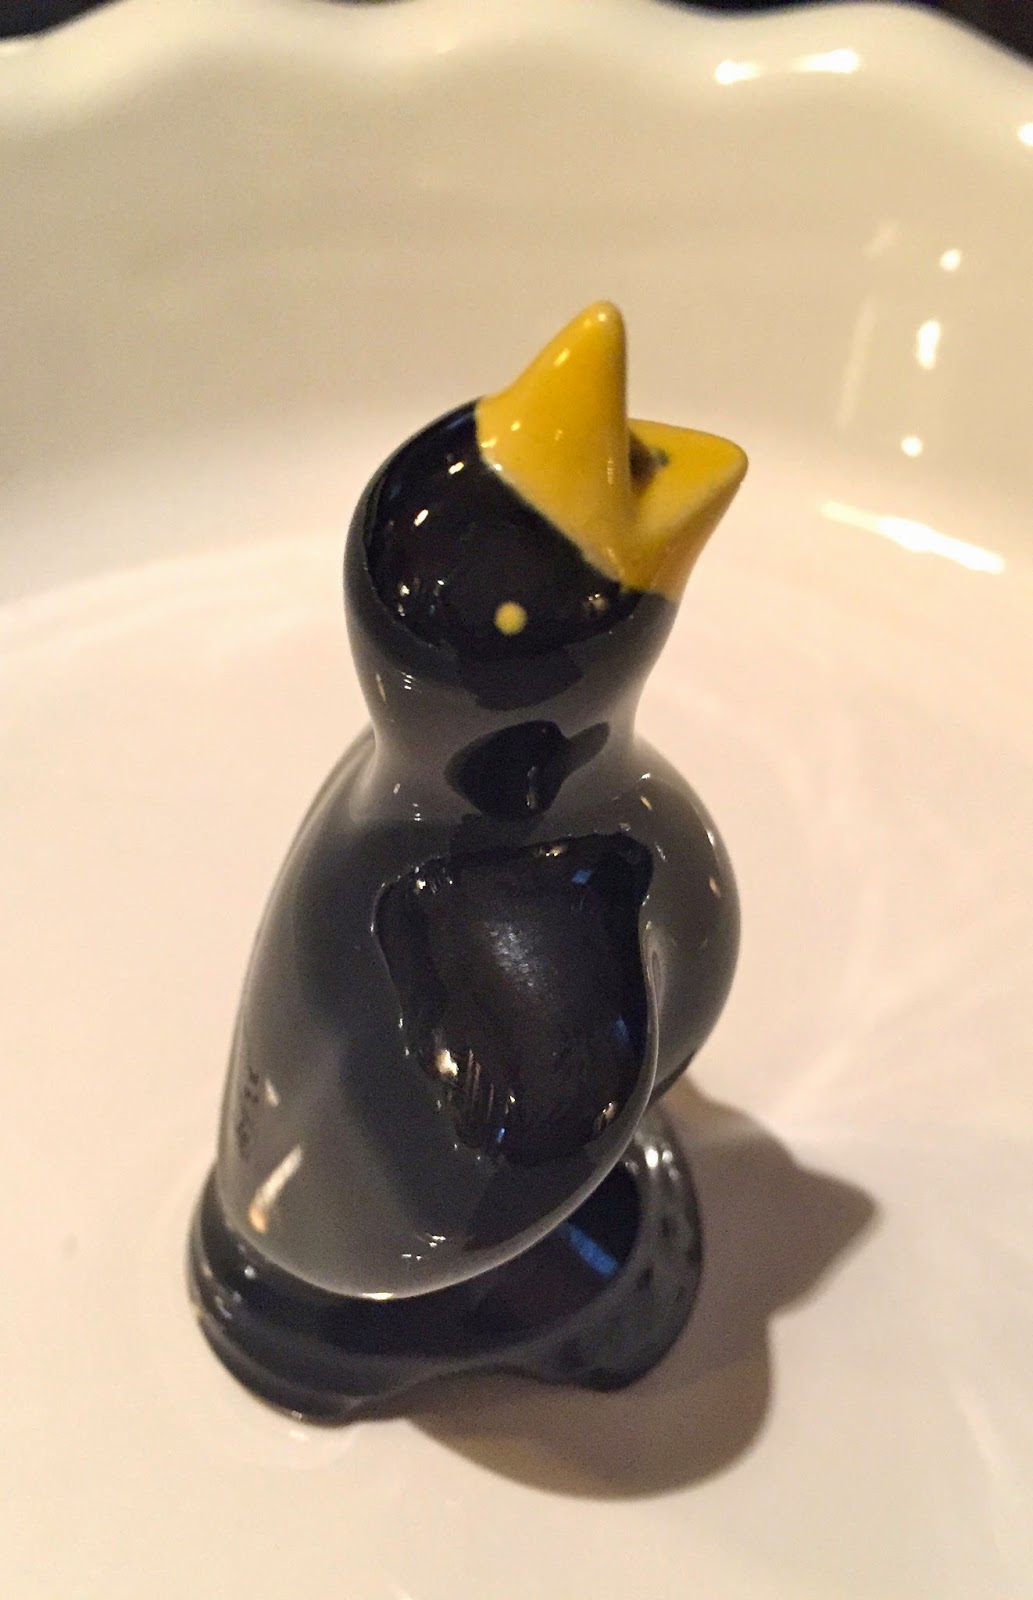
Pie Bird
I don't even remember the first time I heard about the use of a pie bird to ensure an especially flaky pie crust. It's been years. At the time, I looked high and low for one as I could easily picture one of my grandmas using one to support her crust as she piled heaping layers of apples to form the much awaited treat. Not only does the pie bird support the crust, but it vents the crust, too. By allowing steam to escape through its beak, the pie filling won't boil over and leak through the crust. With no luck in finding one, I frankly forgot about it.
What a delight to run across one at a little boutique in Dalton, Georgia during the holidays! At a time when you're supposed to be looking to buy gifts for others, this was one of those "to me from me" gifts that I couldn't pass up. I couldn't wait to use it. Then I realized I really don't love good 'ole fashioned pies with "heaping layers of apples" or any other fruit for that matter. I'd much rather make and eat a good 'ole fashioned chocolate meringue pie or a buttermilk pie, one of Steve's favorites.
After researching possible recipes, the solution became clear: think savory, not sweet. My chicken pot pie! Of course! The original recipe says to brown the bottom pie crust. I didn't. I layered it in a pie plate, lightly sprayed with Pam, then placed the pie bird in the center.
Add filling . . .
After taking me years to finally find my pie bird, I ran across another one in a boutique in downtown Franklin last month. I snatched it up for Keely. I'm thinking these little guys are making a comeback. I don't know what took them so long!
Chicken Pot Pie
Ingredients:
Mix all ingredients together except pie crust and heat together. For a two-crust pie, brown 1 Pillsbury pie crust in a deep round 2-quart casserole dish. Pour in filling. Top with other crust. Bake at 375 degrees for approximately 40 minutes, or until crust is lightly browned.
If using the pie bird method as described above, don't brown the bottom pie crust before adding filling. Also, bake for approximately 25-30 minutes instead of 40 minutes. You will have extra filling if using a pie plate instead of a 2-quart casserole dish. This is perfect for making individual freezer portions.
Note: This freezes really well. I have only done this with a one-crust pie. Pour filling into any size of casserole dish/pie plate that has been sprayed with Pam. (This is great to divide into smaller portions for multiple make-ahead meals.) Top each smaller casserole with crust and cover with aluminum foil. Don’t bake before freezing. When ready to eat, bake at 375 degrees for about 75 minutes if frozen, or until hot and bubbly.
What a delight to run across one at a little boutique in Dalton, Georgia during the holidays! At a time when you're supposed to be looking to buy gifts for others, this was one of those "to me from me" gifts that I couldn't pass up. I couldn't wait to use it. Then I realized I really don't love good 'ole fashioned pies with "heaping layers of apples" or any other fruit for that matter. I'd much rather make and eat a good 'ole fashioned chocolate meringue pie or a buttermilk pie, one of Steve's favorites.
After researching possible recipes, the solution became clear: think savory, not sweet. My chicken pot pie! Of course! The original recipe says to brown the bottom pie crust. I didn't. I layered it in a pie plate, lightly sprayed with Pam, then placed the pie bird in the center.
Add filling . . .
. . . then carefully add the top crust allowing the pie bird's beak to poke through.
I'm still grateful to my friend Renee who first shared her recipe with me when our girls were in elementary school. It is already in our family cookbook. (By the way, the secret ingredient
is the cream cheese.) I have made
this over and over as it’s the perfect “comfort food.” Yet Steve and Keely agreed that last night's version was the best one to date. The addition of the pie bird indeed yielded a much flakier crust.
After taking me years to finally find my pie bird, I ran across another one in a boutique in downtown Franklin last month. I snatched it up for Keely. I'm thinking these little guys are making a comeback. I don't know what took them so long!
Chicken Pot Pie
Ingredients:
- 1/2 block of cream cheese
- 2 cans cream of chicken soup
- 2 cans Veg-all (I use a 16 oz bag of frozen mixed veggies instead. I also add several red potatoes, chopped and cooked.)
- 3 cooked chicken breasts, shredded
- salt and pepper to taste
- may need to add a little chicken broth
- 1 package Pillsbury pie crust in the refrigerated section
Mix all ingredients together except pie crust and heat together. For a two-crust pie, brown 1 Pillsbury pie crust in a deep round 2-quart casserole dish. Pour in filling. Top with other crust. Bake at 375 degrees for approximately 40 minutes, or until crust is lightly browned.
If using the pie bird method as described above, don't brown the bottom pie crust before adding filling. Also, bake for approximately 25-30 minutes instead of 40 minutes. You will have extra filling if using a pie plate instead of a 2-quart casserole dish. This is perfect for making individual freezer portions.
Note: This freezes really well. I have only done this with a one-crust pie. Pour filling into any size of casserole dish/pie plate that has been sprayed with Pam. (This is great to divide into smaller portions for multiple make-ahead meals.) Top each smaller casserole with crust and cover with aluminum foil. Don’t bake before freezing. When ready to eat, bake at 375 degrees for about 75 minutes if frozen, or until hot and bubbly.
- Sing a song of sixpence, a pocket full of rye.
- Four and twenty blackbirds, baked in a pie.
- When the pie was opened, the birds began to sing.
- Wasn't that a dainty dish to set before the king?
Subscribe to:
Posts (Atom)